13 October 2010
elp class 3 part 2 - screen printing - standard method
SCREEN PRINTING METHOD
This is more the screen printing method I had in mind as this is more versatile, can do really intricate details - basically if you can get it as a black and white image you can print it - but the main problem is it can not be done at home! I absolutely love this process though and have got a few projects in mind so will come back and do more.
Basically the idea is to use the photo exposure unit to 'print' the image onto the screen mesh, and it will do what the newsprint does, except the black lines will be where the color will print through.
1) First have the image in acetate, or good quality paper. A strong black and white image is good.
2) Prepare the screen with a screen emulsion ( light sensitive, to be applied in a room with no daylight). Use gloves. The emulsion is a blue green colour. It comes in yellow and a blue tins to be mixed together.
3) Put the emulsion in an emulsion trough, the screen mesh at an angle, and pushing the trough against the screen and lightly tip it, moving from bottom up, to put a shiny coat of emulsion on the screen. Wipe away excess emulsion at the edges.
4) Wait for the emulsion to dry, takes 30 mins, or 5 mins with a hair dryer.
5) Put the image the way you want it to be viewed, put the frame down on the exposure unit, follow timing and instruction as required.
6) Afterwards, take it to the wash room and use water to wash away the emulsion, you should see you image emerge. Spray the water gently in the beginning and more later. Wash both sides.
7) Blot each side with newsprint to get rid of excessive water, blow dry and ready for printing.
8) See stencilling process for the printing - same.
9) Once finish scrub the screen with a brush and cleaning agent, then use high water pressure gun to clean. remember to wear gloves, goggles, breathing mask and for me very important - ear protections! ( I forgot and my ears rung for a while)
TIPS:
a) If not using the acetate or translucent paper for the image then use a good photocopy or print on good paper and apply vegetable oil back and front to make it translucent. Blot away excessive oil.lack and white image you can print it
b) Think about the positive and negative side of the final prints!
c) exposed image can stay on the screen for years if need be!
elp class 3 part 1 - screen printing - stencil method
STENCILLING METHOD
Now this is my favourite part of the whole course, screen printing. I absolutely love this process and have always wanted to do this again after a brief course but it proves to be rather difficult to find a place that does it. Anyway here at East london Printmaker they do so that is great!
Stencilling method is basically cutting paper and carry it out very much like you would with stencilling, but in this case with the screen printing context.
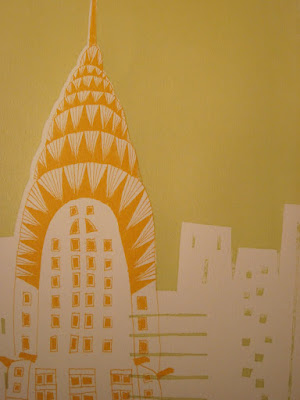
I already had an image, an cartoonish version of the chrysler building and wanted to use colour stenciling to put in the sky and some simple building shapes. A note about my cartoon building - I used polymer ink ( non water soluble when dry, similar to indian ink) on 'true grain' paper, so it is translucent and holds the ink well. Note that it does take a while to dry so do this early.
1) Use the lightbox so you can superimpose on the image to see how you want to achieve the background to complement your original image.
2)Decide on the design and then cut on newsprint ( will last about 20 prints despiite looking a bit fragile, even a very fine point of the building works ok, but a bit problematic with the small window opening) using a scarpal to cut OUT the area you want to see the ink.
3) Now choose the colour you want, from basic acrylic ink range( water soluble) and then mix it with equal amount of the acrylic binding medium to stop it from drying too quickly. Note the more of this medium you put the more translucent the paint becomes. Mix throughly well.
4) Next take a screen and tape the newsprint securely to it, and make preparation next to your screen print work area, and have the following ready -
- newspaper to cover the table, extra for ink surface
- exact size papers( otherwise the setting out will not work!)
- white masking tape for register marks
- brown masking tape for emergency masking of the screen mesh
- ink
- squeegee
- cleaning cloth
- bucket of water with sponge
- tape an acetate on the board for testing
- hard cardboard ( to wipe the ink from squeegee and the frame and save!)
5) Set up and tighten the frame to the machine, put some paint on, and wipe the squeegee up when the whole machine is lifted up and then pull it down and wipe the squeegee with paint down to print the image on the acetate
6) review the image on the acetate and put the paper underneath to position it in the location you want. Then put white masking tapes at the corners for locating further prints
7) Have the squeegee at a 45 deg angle up ( just to position and flood the frame to give it the ink) and bring it the other way around down to actually print on the paper. Do it once so there won't be too much ink. Do it evenly, slowly and steadily and watch out for the amount of ink that is being printed, if need be run it once over)
8) After printing wash the frame and clean everything up and throw away newsprint.
TIPS:
a) The machine when turn on will suck the paper down and put it in place.
10 October 2010
elp class 2 part 2 - etching - soft ground
SOFT GROUND PROCESS
Soft ground is to give the image more texture.
1. After the hard ground printing, clean off the zinc plate with white spirit ( or better, use safe wash)
2. use vinegar(or ammonia but too smelly and a bit toxic) and whitening powder to clean the plate for degreasing and dry with hair dryer ( see steps 3 and 4 for hard ground for the steps in more details)
3. Put on hot plate to apply soft ground, but the hot plate should be less hot ( 35 deg rather than 70 deg) and roll on to apply evenly. The final colour should be a honey glazed.
4. Use different fabric and material to create the texture - I used tissue paper to create the cloud effect and draw the shadow on with a soft pencil on a tissue paper over the drawing
5. See hard ground for the acid process, basically the same except we use the weaker acid ( strength ratio 1 : 16 ) for about 2 mins, note can't use feather as the plate now is more vulnerable
6. clean off with water afterwards and then dry and apply ink as the hard ground process.
8 October 2010
eLP class 2 part 1 - etching - hardground
ETCHING
Etching, simply put, is a process by which a protective layer( usually wax and bitumen) is applied on a metal plate ( zinc for our class, and most common) lines are then drawn on it and the plate leave in nitric acid for sometime. The acid will then 'bite' into the metal surface where the lines are and ink is applied for prints.
My camera broke down in the beginning so I only have one image to show! Oh well....
We have done the hard ground and soft ground and I will divide the process up in two for ease of reference.
HARD GROUND PROCESS
1. Take the pre cut zinc plate and file off its 4 edges with a file at a 45 deg to take off the sharp edge
2. Polish the zinc plate with 'Brasso' and a soft absorbent cloth ( cotton) to get rid of the grainy surface ( the plate looks smooth and shiny but it is not, if not polish the grainy texture will make the background grey, but some people may actually prefer this) Polish this twice should be sufficient.
3. Degrease the plate to get rid of the oil on the next step - the wax won't stick. Use soft cloth( old etching blanket), whitening powder and a few drops of ammonia. ( there are also other alternative that comes as a cream and less toxic and smelly) then rinse with water, aim to have no residue.
4. Dry the plate with hair dryer
5. Once dry put on the hot plate (70 deg) and apply the hard ground wax by rubbing and twisting, then use the roller to apply it flatly until you get an even marmite looking layer. * Clean the roller with white spirit and roll on newspaper to clean it.
6. Can smoke the plate with the tip of the flame, make sure not for too long, only lightly and quickly so to darker the wax for drawing on.
7. Now draw on with etching needle, can use stopped out ink to correct any mistakes, or have to do from step 3 again.
8. Now create a pull handle with masking tap to pull the plate out from the acid bath and a sticky back to protect the back of the plate so the acid doesn't thin out the plate too much.
9. Immerse the plate in Nitric acid ( 1:8 strength ratio, note if the acid has been used too much the strength will be less too) for 8 minutes. Ensure ventilation is on, Make sure wear glove, mask and gloves, can use the feather to lightly brush away the bubbles that may collect on the surface too much. ( More so for copper plate, zinc should be less of a problem) RINSE the feather afterwards.
10. After take it out and rinse with water, then white spirit to get the metal surface or printing
11. In the meanwhile, soak up papers(200 gsm minimum, usually good quality is 300 gsm somerset)and use blotter papers to blot out excessive water
12. Ink up plate with intaglio ink, use rubber or card board to wipe over the whole surface and twist and rub in with hard 'squeens'
13. Prepare on the Press first a piece of butter paper on the press, then with metal plate facing up, then the blot out paper, then tissue paper to protect the blanket on top.
SOME TIPS
a. Could also use the dry point method, to draw directly o the metal plate to skip the acid step, but this won't last , may only get 3 editions of the image.
b. can tell the difference between soft and hard ground by trying to dig the nail into the piece, soft ground - nail can be dug in
c. People use copper plate and leave in Ferric acid, it takes longer but the lines are finer than the zinc plates, but because it is slower it is also easier to control.
Subscribe to:
Posts (Atom)