13 October 2010

elp class 3 part 2 - screen printing - standard method


SCREEN PRINTING METHOD

This is more the screen printing method I had in mind as this is more versatile, can do really intricate details - basically if you can get it as a black and white image you can print it - but the main problem is it can not be done at home! I absolutely love this process though and have got a few projects in mind so will come back and do more.

Basically the idea is to use the photo exposure unit to 'print' the image onto the screen mesh, and it will do what the newsprint does, except the black lines will be where the color will print through.

1) First have the image in acetate, or good quality paper. A strong black and white image is good.

2) Prepare the screen with a screen emulsion ( light sensitive, to be applied in a room with no daylight). Use gloves. The emulsion is a blue green colour. It comes in yellow and a blue tins to be mixed together.

3) Put the emulsion in an emulsion trough, the screen mesh at an angle, and pushing the trough against the screen and lightly tip it, moving from bottom up, to put a shiny coat of emulsion on the screen. Wipe away excess emulsion at the edges.

4) Wait for the emulsion to dry, takes 30 mins, or 5 mins with a hair dryer.

5) Put the image the way you want it to be viewed, put the frame down on the exposure unit, follow timing and instruction as required.

6) Afterwards, take it to the wash room and use water to wash away the emulsion, you should see you image emerge. Spray the water gently in the beginning and more later. Wash both sides.

7) Blot each side with newsprint to get rid of excessive water, blow dry and ready for printing.

8) See stencilling process for the printing - same.

9) Once finish scrub the screen with a brush and cleaning agent, then use high water pressure gun to clean. remember to wear gloves, goggles, breathing mask and for me very important - ear protections! ( I forgot and my ears rung for a while)

TIPS:
a) If not using the acetate or translucent paper for the image then use a good photocopy or print on good paper and apply vegetable oil back and front to make it translucent. Blot away excessive oil.lack and white image you can print it
b) Think about the positive and negative side of the final prints!
c) exposed image can stay on the screen for years if need be!

elp class 3 part 1 - screen printing - stencil method


STENCILLING METHOD

Now this is my favourite part of the whole course, screen printing. I absolutely love this process and have always wanted to do this again after a brief course but it proves to be rather difficult to find a place that does it. Anyway here at East london Printmaker they do so that is great!

Stencilling method is basically cutting paper and carry it out very much like you would with stencilling, but in this case with the screen printing context.

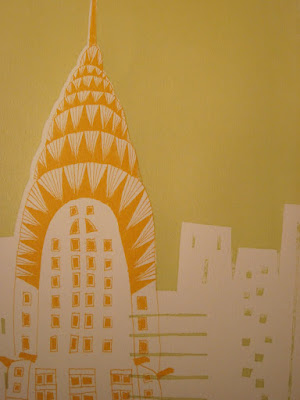
I already had an image, an cartoonish version of the chrysler building and wanted to use colour stenciling to put in the sky and some simple building shapes. A note about my cartoon building - I used polymer ink ( non water soluble when dry, similar to indian ink) on 'true grain' paper, so it is translucent and holds the ink well. Note that it does take a while to dry so do this early.

1) Use the lightbox so you can superimpose on the image to see how you want to achieve the background to complement your original image.

2)Decide on the design and then cut on newsprint ( will last about 20 prints despiite looking a bit fragile, even a very fine point of the building works ok, but a bit problematic with the small window opening) using a scarpal to cut OUT the area you want to see the ink.

3) Now choose the colour you want, from basic acrylic ink range( water soluble) and then mix it with equal amount of the acrylic binding medium to stop it from drying too quickly. Note the more of this medium you put the more translucent the paint becomes. Mix throughly well.

4) Next take a screen and tape the newsprint securely to it, and make preparation next to your screen print work area, and have the following ready -
- newspaper to cover the table, extra for ink surface
- exact size papers( otherwise the setting out will not work!)
- white masking tape for register marks
- brown masking tape for emergency masking of the screen mesh
- ink
- squeegee
- cleaning cloth
- bucket of water with sponge
- tape an acetate on the board for testing
- hard cardboard ( to wipe the ink from squeegee and the frame and save!)

5) Set up and tighten the frame to the machine, put some paint on, and wipe the squeegee up when the whole machine is lifted up and then pull it down and wipe the squeegee with paint down to print the image on the acetate

6) review the image on the acetate and put the paper underneath to position it in the location you want. Then put white masking tapes at the corners for locating further prints

7) Have the squeegee at a 45 deg angle up ( just to position and flood the frame to give it the ink) and bring it the other way around down to actually print on the paper. Do it once so there won't be too much ink. Do it evenly, slowly and steadily and watch out for the amount of ink that is being printed, if need be run it once over)

8) After printing wash the frame and clean everything up and throw away newsprint.

TIPS:
a) The machine when turn on will suck the paper down and put it in place.

10 October 2010

elp class 2 part 2 - etching - soft ground


SOFT GROUND PROCESS

Soft ground is to give the image more texture.

1. After the hard ground printing, clean off the zinc plate with white spirit ( or better, use safe wash)

2. use vinegar(or ammonia but too smelly and a bit toxic) and whitening powder to clean the plate for degreasing and dry with hair dryer ( see steps 3 and 4 for hard ground for the steps in more details)

3. Put on hot plate to apply soft ground, but the hot plate should be less hot ( 35 deg rather than 70 deg) and roll on to apply evenly. The final colour should be a honey glazed.

4. Use different fabric and material to create the texture - I used tissue paper to create the cloud effect and draw the shadow on with a soft pencil on a tissue paper over the drawing

5. See hard ground for the acid process, basically the same except we use the weaker acid ( strength ratio 1 : 16 ) for about 2 mins, note can't use feather as the plate now is more vulnerable

6. clean off with water afterwards and then dry and apply ink as the hard ground process.

8 October 2010

eLP class 2 part 1 - etching - hardground


ETCHING

Etching, simply put, is a process by which a protective layer( usually wax and bitumen) is applied on a metal plate ( zinc for our class, and most common) lines are then drawn on it and the plate leave in nitric acid for sometime. The acid will then 'bite' into the metal surface where the lines are and ink is applied for prints.

My camera broke down in the beginning so I only have one image to show! Oh well....

We have done the hard ground and soft ground and I will divide the process up in two for ease of reference.

HARD GROUND PROCESS
1. Take the pre cut zinc plate and file off its 4 edges with a file at a 45 deg to take off the sharp edge

2. Polish the zinc plate with 'Brasso' and a soft absorbent cloth ( cotton) to get rid of the grainy surface ( the plate looks smooth and shiny but it is not, if not polish the grainy texture will make the background grey, but some people may actually prefer this) Polish this twice should be sufficient.

3. Degrease the plate to get rid of the oil on the next step - the wax won't stick. Use soft cloth( old etching blanket), whitening powder and a few drops of ammonia. ( there are also other alternative that comes as a cream and less toxic and smelly) then rinse with water, aim to have no residue.

4. Dry the plate with hair dryer

5. Once dry put on the hot plate (70 deg) and apply the hard ground wax by rubbing and twisting, then use the roller to apply it flatly until you get an even marmite looking layer. * Clean the roller with white spirit and roll on newspaper to clean it.

6. Can smoke the plate with the tip of the flame, make sure not for too long, only lightly and quickly so to darker the wax for drawing on.

7. Now draw on with etching needle, can use stopped out ink to correct any mistakes, or have to do from step 3 again.

8. Now create a pull handle with masking tap to pull the plate out from the acid bath and a sticky back to protect the back of the plate so the acid doesn't thin out the plate too much.

9. Immerse the plate in Nitric acid ( 1:8 strength ratio, note if the acid has been used too much the strength will be less too) for 8 minutes. Ensure ventilation is on, Make sure wear glove, mask and gloves, can use the feather to lightly brush away the bubbles that may collect on the surface too much. ( More so for copper plate, zinc should be less of a problem) RINSE the feather afterwards.

10. After take it out and rinse with water, then white spirit to get the metal surface or printing

11. In the meanwhile, soak up papers(200 gsm minimum, usually good quality is 300 gsm somerset)and use blotter papers to blot out excessive water

12. Ink up plate with intaglio ink, use rubber or card board to wipe over the whole surface and twist and rub in with hard 'squeens'

13. Prepare on the Press first a piece of butter paper on the press, then with metal plate facing up, then the blot out paper, then tissue paper to protect the blanket on top.


SOME TIPS
a. Could also use the dry point method, to draw directly o the metal plate to skip the acid step, but this won't last , may only get 3 editions of the image.
b. can tell the difference between soft and hard ground by trying to dig the nail into the piece, soft ground - nail can be dug in
c. People use copper plate and leave in Ferric acid, it takes longer but the lines are finer than the zinc plates, but because it is slower it is also easier to control.

29 September 2010

ELP class 1 part 3 - Monoprint


MONOPRINT PROCESS

Monoprint, as the name suggests, is a single print. This is so because whatever you print will only be done one time as it is, the next time it will have a different effect. It is an extremely free process as you can make whatever marks and texture you want. You an also add to your print or acetate afterwards to create different effects, really everything goes and there are no restrictions. You can rub doen areas with safewash or add ink to other areas. I adore the Australian painter John Olsen and I love his print 'the laughing frog' so I based the print on that.

1. We were given acetate to work on to roll a layer of ink on it. Up to you how much ink you want as it will have a different effect that could be quite interesting. I have started rubbing, using thin line metal on the surface and also using safewash so it had a water colour effect.
2. After he work is done then it is onto the etching press with a big wheel to press it firmly onto paper.
3. I tried to be more experimental with the next one but put a bit too much ink on so the black ink dominated but never mind - when it dries I plan to paint on top of it with white lines...this is truly a free process but having said that, any drawing process is like that, you can match and mix until you get the effect you want and today this idea made quite an impression on me.

ELP class 1 part 2 - Lino printing - reduction method


REDUCTION PRINT PROCESS

Reduction print is basically using the mono colour ones that we have already done and do more to the original lino and print with another layer of colour ON TOP of the original ones. Note that this processs can occur for a number of colours, going from lightest to darkest. We have done black as the second 9 and therefore final) layer for this image. As it is the overlaying process the positioning of the prints are important. having said that if they are slightly offset they also often become more interesting.

1. Note the previous print's ink has to be dry first.
2. Gauge out additional area, note that area that you gauge out now will have the colours of the previous ( in this case, red) colour, white remains white, and whatever you don't touch becomes the new colour ( black in this case)
3. Roll a layer of a different colour ( black) on and press on as before.

ELP class 1 part 1 - Lino printing


I have enrolled in the East London Print makers for an introduction to printmaking course which lasts 3 full days.

I have done 3 printmaking courses in the City Lit in the past and one screen printing in the London college of printing and communications but it has been almost 2 years since I did any print making related course so I thought to do this to refresh my memory.

I will record down what I did today in three parts, the morning is Lino cut, reduction print and the afternoon is Monoprint.

A note about ELP - the space is wonderful and very inspiring, with many art work hanging around that are both impressive and brilliant. Our tutor Ms Ann Norfield is also very knowledgable and helpful, making the day a very pleasant learning experience.

LINO PRINT - PROCESS
Very simple and straight forward process.

I did a sketch of a Penny farthing and used it as the basis of the sketch. Rather than just gauging out the lines I created some patterns to make it more interesting. Basically the process is rather straight forward;

1. Get a piece of lino and put in on a hot plate to soften it to make it easier to do the cutting. Best to use pencil to outline what you want to do. Cut out using a variety of cutting tools.
2. Spread out 50% ink and 50% extender to thin out the ink, mix the two and then use a palette knife to spread it on one side and roll it with a roller. Good if it has a hissing sound so it is nice and thick. But not too thick!
3. When the ink is nice and even then apply to the lino at least 10 times before putting it under the press.
4. Note that the first couple of prints the colour won't be too strong as the lino is absorbent and will absorb some ink.
5. We used an albion press - it is important to put some guidelines on the press itself so you know where to place the paper. ( Also handy for the reduction process in the next session) Note that the longer you press it for ( min 5 seconds) the deeper the colour too.
6. When ll is finished than use safewash to clean up, it is safe but still slightly greasy. If absolutely necessary then use white spirit but not recommended.
7. To clean your hands use Citrus clean, a slightly grainy cream to be applied to dry hands to rub then wash off.

LINO PRINT - SOME TIPS
a. Note that for the lino prints Relief ink is used - it dries faster than intaglio ink as it is meant to be applied to a surface.
b. Make sure the rollers are cleaned! If not wipe it with safewash ( vegie oil base cleaning product) and roll it a couple of times on papers to make sure it is ok.
c. Look after your rollers by standing them on the little stands they come with.
d. If the ink is too thick then add 2 drops of copperplate oil, this is especially so for any black ink.

19 April 2010

psta egg tempera class day 5


Today we start on oil, so we are finally adding colours! We also did the glair layer to separate the egg tempera and learnt to make oil paint from scratch ( well from the pigments..)

PROCESS
1. First we apply 3 coats of glair*( recipe from previous days) on top of the painting, and it became more glossy. Apply using a varnishing brush or a wide sable, remember not to over brush or it will come off, allow each layer to dry before applying the next, and then leave for at least an hour ( We left it for 3 hours while making oil paint) Note we added water to glair mix, otherwise it will be too strong and the egg tempera will crack.

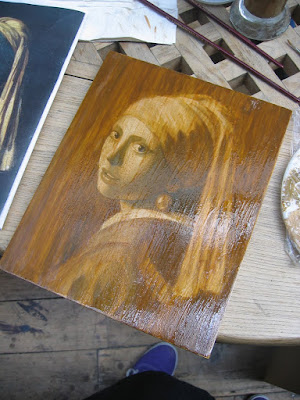
2. Before applying the oil we used a resin(dammar, can be bought from shop) mixed with black, yellow orche, burnt sienna pigment to make it a warm colour (like a verdaccio without the white, and a bit more burnt sienna) and 25% poppy oil to thin it out and then use hog brush to paint over the painting. I have to say it was a bit worrying as the whole painting turned brown, but you wipe it off with the side of your hand and clean your hand with a cotton cloth ( NO tissue!!) after each wipe and it just adds a slight warmth to the painting and nothing else - Now it is ready for the oil paint.

3.As with tempera you paint the darkest colours first, for my background the tutor suggested a bit of yellow to the black to make a coldish background ( green black) to contrast with the warmth of the figure. The technique with the oil is not dissimilar with the tempera process - you build up layers bit by bit, and never apply one colour to one area, always mix and build with different very thin, subtle layers. The colours of the turban was varying blues, yellow, white, and dark blue. the shadow on the face was a building up of brown thin by fingers!

4. Note the dammar will be good for 6 hours and then it is needed again when I next get to paint the painting again, I shall update the progress on this web site in the next couple of weeks.


RECIPE - OIL PIGMENTS
- Note that the 3 basic oil to use are linseed, walnut and poppy seed oil.
Linseed
Most commonly used, fastest drying, but yellows more, the cold pressed variety maybe better, also if leave in the sun it can bleach out the yellowness more.
Walnut
popular with the 16th C Italian painters, dries slower, the supermarket variety is not right, needs to purified.
Poppy
This is Rembrandt 's favourite for grinding white as it is the least yellow oil, dries the slowest and the thinnest.
- Note thick oil makes thinner paint, thin oil makes the paint more buttery and less runny
- All pigments dry at different rates, lead based ones dry quickest, blues too. Also advantageous to use poppy for mixing these colours as it is the least yellow and won't turn blue into green, white into yellow etc
- Note titanium white and zinc white best with walnut oil
- All earth, black and synthetic colours are ok with linseeed as they don't get affected much by the yellow
- Note pigments all need different amount of oil, so add a bit at the time, grind a small amount ( walnut size) well and it should be shiny and not dull when using the palette knife to gather on the grinding surface. The texture should feel buttery.
Lead white will be runny with small amount of oil, raw sienna needs lots of oil.
- Less oil = less gloss
- Spread the pigment thinly and grind the paint really fine so all will mix well, better to over grind than under grind to mix the pigment and oil well to retain shine.
- If store with Aluminium foil and let out the air the oil paint should keep for several weeks, tube ones tend to have less oil.


RECIPE - EGG TEMPERA ON CANVAS
Notes to come!

OTHER TIPS
-Turpentine - if brush on paper and it doesn't yellow too much then it is good quality

15 April 2010

psta egg tempera class day 4


Today we worked on building up the shadows and depth of our painting with egg tempera

PROCESS

1. As we have left the painting overnight we had to 'seal' the painting with 2 parts egg tempera and 1 part water first and let it dry before starting work again, note that the paint that was done yesterday could still be brushed off if too harsh so be quick and gentle with the painting.

2. The rest of the day is to vary the tones of the pigments we have, at one point I was using very little water on my pigment and the paint became too thick, this is not to be recommended! You also do not want to see brush strokes, egg tempera is about building up the tones subtly.

3. Remember to dilute the paint thinly with water and apply layers ( dry between each layer) to build it up and it really makes the shadows vary very subtly.

4. Also I wasn't creating enough contrast between the colours, you really have to look at the painting carefully to think about where the light is and emphasis it with the white. I varied the whiteness in the lighter area and it really showed. I learnt too that some minor details can make a big difference - for example the lights and shadows under her eyes made such a difference to her expression compare to yesterday.

RECIPE - TEMPERA GRASSO
This is a method used by Botticelli,
1 part egg yolk and 1 part oil to mix with the pigments

OTHER TIPS
- Egg tempera is generally good for still life and not landscape, as landscape has more variation, textures and more fluid

14 April 2010

psta egg tempera class day 3


PROCESS

1. Today we build up the painting from the day before, now that my 3 layers of verdaccio middle tone has dried off I have to make 3 basic verdaccio and apply it to the painting over and over again on a thin layer, until we build up something substaintial.

2. We now mix the pigments into 3 tones, by varying the amount of white we add to each to create light, middle and dark tones.

3. Then we add 1 part egg tempera to each tone and some water to dilute each, before applying them very thinly ( dab your brush on some tissues) to create first the dark, then middle then light tones, creating at least 5, 6 fine layers before moving onto the next tone, and start over again to create depth.

4. Note that when creating the tones as you go along they can vary slightly as more varying depth in tone is required. I have attached a number of photos showing the progress in the depth through the day.

5. It is very nice to use a small number sable brush to paint the face and details and draw in the details rather than putting brush strikes as you really build up the details.


OTHER TIPS

- the formula to create a basic middle tone is
10% lead white
80% yellow orche
5 % each of black and burnt sienna
vary the light and dark by adding more white and less white and the ratio of the other three will stay the same.
- always use sable brush ( and make sure no hair will come off too easily)
- if paint stay lifting off then mix 2 part egg and vinegar with 1 part white and brush over to seal the parts
- use the same above if leaving the painting overnight to seal and protect it, or after a number of layers to seal the work
- before packing up add a drop of water to the egg and vinegar pigments to keep them from drying out to be used the next day, if it dries out then it is no good anymore.

psta egg tempera class day 2

PROCESS

1. Today we began the day by sanding down the panel (now a gesso panel) with 400 grain sand papers, the process is amazing, the panel feels so super smooth, it is like a baby's bottom!

2. Make sure the surface is all smooth and don't overdo it at the edge when the MDF is prone to show through if there is too much sanding, sand the side too.

3. Then take a piece of tracing paper, pencil and burnt sienna, copy the outline of the painting on the tracing paper, rub the burt sienna at its back, retrace it over the smooth gesso panel.

4. Next trace the outline with egg and vinegar mix to seal the lines.

5. When the lines are dry then seal the whole panel with 1 layer half strength RSG (see tips yesterday) and 2 layers of full strength, do it thinly and quickly and make sure the burnt sienna outline stays.

6. Once that is done then the panel is ready for underpainting. ( see underpainting theory notes later)

7. Picking up from point 6 we now need to prepare the pigment for verdaccio middle tone; to do that we need to get the following 4 pigments done, in the following ratio and thus vary the amount of pigment to be grind.

10 % Lead white
5 % burnt sienna
5 % black
80 % yellow ochre

use a granite or glass ( smooth will be fine) for grinding by glass muller

mix water with each pigment with a palette knife, then spread out and grind with glass muller until smooth then put it aside to be mix as a middle tone verdaccio, note with lead white it is toxic so handle with care( don't inhale or touch, and wash hand after preparations) also it will need to be mixed with vokda as water separates it more.

8. Once the pigment for a middle tone is created, then add equal amount of egg tempera to it and apply it thinly and rapidly in vertical strokes over the painting, thin this with some water to make the thin layers rather translucent, and avoid streaks if possible. Wait for the first layer to dry before doing the next layer, and leave to dry.

UNDERPAINTING(Theory)

- The whole purpose of underpainting is to create a monochromatic tonal composition of the painting with light and shade to give it more depth and luminosity, t will appear flat but critical to provide a base.
- it will need several layers to build up to give it depth, once finished it could come into a painting of its won at times
- Usually a warm colour composition (like a portrait) will needs a cool colour underpaint and vice versa
- tonal variation has to be the same, to intensity the lightness or darkness.
- Verdaccio ( ugly green, a bit like a MDF board colour) is a neutral tonal colour to use if in doubt about which one to use.
- usually give it a middle tone base then start with dark tone, so it will be easier to control the tonal variation
- colours like black will need some white so it won't be too harsh or flat.


OTHER TIPS

3 types of white
- Lead white - versatile, traditional white for al the artists until early 19th century, very stable, dry well with oil, can be thin or heavy but toxic.
- Titanium white - very opaque, bright and bleach other colours
- Zinc white - very tranlucent

PSTA Egg Tempera Class Day 1

So I took up the Egg tempera course as I have longed admire the oil paintings by the old masters and I really wanted to know the technique for creating the magical luminosity in some of those master paintings.

Once again the course was taught at the Princes School of Traditional Arts, a wonderful place that teaches a lot of different traditional arts and I thoroughly recommend it.

This is a 5 full days course and we were kept rather busy. There are a number of steps and a lot of recipes to remember so I am writing them down and I hope you can benefit too. I have divided the sections under these headings.

Day 1 is all about preparation of the panel itself for painting.

PROCESS - showing what I have done on the day step by step
OTHER TIPS - for various notes and tips
RECIPES - for various recipes of mixtures

PROCESS

1. We got given a 15mm thick MDF panel and the first thing was to sand it down with a 400 grain sand panel until smooth

2. We then added 1 layer of 1/2 strength Rabbit Skin Glue RSG*(see recipe) , let it dry then added 2 layers of full strength, let each layer dry off before applying the next. Apply in thin layer, with a broad, flat brush.

3. We added 10 layers ( 8 absolutely minimum) of Gesso*(see recipe) to the panel when it was completely dry. We had to make sure each layer was completely dry before applying the next - we applied in perpendicular sequence ( one vertical, the next horizontal) using varnishing flat brush.

4. We waited at least 12 hours/ overnight before sanding it the next day. - see tomorrow's process for continuation.


RECIPE - Rabbit Skin Glue - Full strength 
RSG is used as a base for all Gesso panels and canvas, papers etc, it seals the surface so the medium does not sink into the panel. It is much better than the acrylic one which will crack in time.
a. The ratio is 1 part RSG granules to 18 parts water
b. First add 1 part RSG to 6 parts of water, NO STIRRING, let it sit and thicken for 10 to 15 minutes on its own
c. add the rest of the water, keep it warm and stir, allow for 20 minutes for it to completely dissolve
- This can keep for a week in the fridge
- do not overheat during the process or it will weaken the glue

RECIPE - Gesso
This is basically chalk, £3 for 3 kg from art shops.
a. It is 1 part RSG to 2 parts whiting ( powder) with water to help dissolve the medium
b. measure out the volume of the powder when it is dry and note the RSG will be half of this
c. add some cold water slowly and stir until the whiting completely dissolve like a creamy yogurt ( when you find it in a delicious texture and want to spoon it in your mouth, then it is ready)
d. Gradually add in the RSG and stir well and then it is ready to be used
e. Note i the beginning this may seem runny but it will thicken
f. pass the mixture through muslin if really need to ( too lumpy etc)
This can be keep in the fridge for 3 to 4 days, the next day even creamier!


RECIPE - EGG TEMPERA
This will be sufficient for a 1m x 1m painting, it is stable, flat in appearance and does not dis colour over time. It is used with pigment to create paint for the underpainting, where shadows are created.
a. It is 1 part egg to 2 parts white, normal vinegar, ( 1 to 6 will be too Matt, 1 to 1 too shiny)
b. crack an egg, get rid of the egg white ( save for Glair, see separate recipe) roll the egg on the hand and wipe the other until the egg yolk becomes tacky, then hold it gently and pinch it to let the egg yolk drop in a jar.
c. add in 2 parts vinegar and stir well - this is the egg tempera
- This can be kept for 2 to 3 months in the fridge.
- vinegar make the egg tougher and less likely to be lifted by painting over
- to be used as 1 part to 1 part with pigment to create paint ( thin by water in the underpainting process)


RECIPE - Glair
This is to be used between the egg tempera layer BEFORE applying oil paint to seal off the egg tempera layer
a. beat 1 egg white for 15 minutes until white and stiff and when turn upside down it doesn't fall
b. pour in 1 ounce of water, DO NOT STIR
c. leave overnight in a cool place
d. pour the liquid in a clean jar the next day
e. add 1/3 of water to its 1 part portion, and apply 3 layers to the egg tempera
f. Leave at least 45minutes before applying the oil paint
- this will make the painting look like it has a glass sheen on top
- this will cover a 1m x 1m surface

PSTA Miniature Painting Class day 4


The Final Finished painting
Picture 1


The last class was about adding more details, and building subtle skin tones, outlines of the face, shadows, and adding some gold ash over the veil and it works like magic. It is a very delicate use of the squirrel brush to create the shade and shadows and I had some help from our teacher Sam. We started the class drawing circles before applying the brush to the surface and it is slow and meditative work. The finished painting took quite some time. In fact I have cheated a bit and went back to the class a few years later to finish it off with Sam's guidance. What you see as a finished piece of work is something that took me a few more evenings to finish.

Overall I really enjoyed the class and had much more to learn. I will definitely be taking the class again and I thoroughly recommend it. ( and I have since)

25 February 2010

PSTA Miniature Painting Class day 3


Picture 1

Picture 2
Class 3 was about painting on layers and layers of thin paint to build up colours, rather than drawing a line we change the colour subtly and then paint it thinly and slowly over and over again until we create a faint shadow that eventually becomes lines and different shades. You can see it with the fold of the dress that I am trying to attempt.

If there is shadow, it is not done with a blocked dark shade colour over once. Instead, it is about using a pale colour and paint it over again and again to create the final shade. This gives the paint more layers and depth.

14 February 2010

PSTA Miniature Painting Class day 2


In our class today we were introduced to the colours, we also prepared them for application, as well as applying them on our wasabi paper.

1. We began our class drawing the circles with the squirrel brush. It is good to start the class with this meditative act and calm our mind into the painting class. We spent about 20 - 30mins to refresh our memories on how to use the squirrel brush, with the Chinese ink that has been thinned out with water.


2. We learnt many different colour pigments and their names such as cinnabar, indigo, malachite...lovely lovely names. We then learnt how to turn these pigments into usable paint colours by grinding the pigments on a sandblasted glass surface with a glass muller, mixed with water ( a couple of teaspoons) and gum arabic ( about 1/2 teaspoon) . Note that gum arabic is a medium to bind the colour to the painted surface, if too much is added the paint will eventually crack, but it too little is added the paint is runny and will rub off.  Best to test the mixed paint on a piece of paper and rub it with finger after the paint is dry to test whether there is sufficient gum arabic. We then spent a good hour just grinding and preparing paint.


3. We then learnt to mix the paint colours we needed for our painting, and we started to 'block' the colour - by filling in the basic colours of our painting composition. This exercise also took a while as we had to test out and mix until we could match the colours to our satisfaction. Note that for the background colours we used normal sable brush to fill up and block the colours. 


We will be adding details next week.

5 February 2010

PSTA ( Prince's School of Traditional Arts) Miniature Indian painting Class 1 - Lady in yellow

I went to the wonderful exhibition 'Garden and Cosmos' at the British Museum the year before, and again saw it at the NSW Art Gallery and really loved it, so when I found out the class is being taught at the Prince's School of Traditional Arts, I decided to enrolled immediately.

The course I got enrolled in is a 4 day full day (Saturdays) course starting form 10am till 4pm in a comfortable pace. Our teacher Samantha is a very experienced and lovely lady who is truly knowledgable and passionate about her art, making it a real pleasure to learn.

In our first class, Sam gave us a brief introduction and showed us some of her works. We also got to look through a number of books, to choose work that we would like to replicate for the class in order to learn the skills. I chose a painting with a lady preparing a meal with a brilliant lemon yellow background.

We then got a prepared Wasali paper already stuck on the broad, ready to be used. Wasli paper is a specially prepared paper used for miniature painting. It has a smooth surface and can withstand being painted on a number of times.

1. First thing we did was to brundishing the paper to make the surface shinny and smooth. We each chose a smooth stone and use gently but firm pressure to systematically rub the surface of the paper horizontally and then vertically from one end to the other, until it is reasonably smoother and shinier than before.

2. Secondly Sam gave us a cup of strong tea to brush over the paper to give it some undertone. ( approx 5 teabag in one mug of cold water) We used it to brush over the wasabi paper surface, leave it to dry and then do it again, for about 4- 5 times. It could vary depending on the background colour you have for your chosen painting.

3. The chosen painting is photocopied, then we use pencil and tracing paper to trace over the key main lines of the painting, no details at this stage but to get the proportions right.


4. We then rubbed some ochre powder at the back of the image's pencil line with cotton wool.

5. Lastly we positioned the tracing paper over the Wasali paper and taped them down, and then traced the pencil outline again, this time onto the Wasali paper. At the end we all had a ochre powdered lines on the wasabi paper.


6. We then got introduced to the squirrel brush used specifically for Indian miniature painting. It has a nice curve and tapers off to a sharp point so can shade and draw on really minuscule details. To begin off we learn to draw small  delicate circles and practice using it again and again.


7. Once we feel we are comfortable with the brush we then use very pale brown ink to seal the ochre lines on the Wasali paper, as these are merely powdered lines etched into the paper and needs drawing over, otherwise they will fade further before our next class.