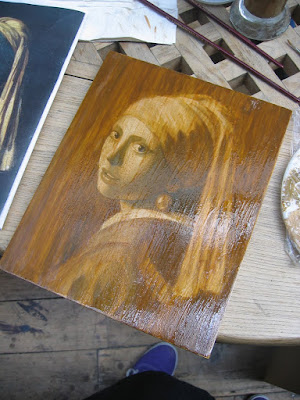


Today we start on oil, so we are finally adding colours! We also did the glair layer to separate the egg tempera and learnt to make oil paint from scratch ( well from the pigments..)
PROCESS
1. First we apply 3 coats of glair*( recipe from previous days) on top of the painting, and it became more glossy. Apply using a varnishing brush or a wide sable, remember not to over brush or it will come off, allow each layer to dry before applying the next, and then leave for at least an hour ( We left it for 3 hours while making oil paint) Note we added water to glair mix, otherwise it will be too strong and the egg tempera will crack.
2. Before applying the oil we used a resin(dammar, can be bought from shop) mixed with black, yellow orche, burnt sienna pigment to make it a warm colour (like a verdaccio without the white, and a bit more burnt sienna) and 25% poppy oil to thin it out and then use hog brush to paint over the painting. I have to say it was a bit worrying as the whole painting turned brown, but you wipe it off with the side of your hand and clean your hand with a cotton cloth ( NO tissue!!) after each wipe and it just adds a slight warmth to the painting and nothing else - Now it is ready for the oil paint.
3.As with tempera you paint the darkest colours first, for my background the tutor suggested a bit of yellow to the black to make a coldish background ( green black) to contrast with the warmth of the figure. The technique with the oil is not dissimilar with the tempera process - you build up layers bit by bit, and never apply one colour to one area, always mix and build with different very thin, subtle layers. The colours of the turban was varying blues, yellow, white, and dark blue. the shadow on the face was a building up of brown thin by fingers!
4. Note the dammar will be good for 6 hours and then it is needed again when I next get to paint the painting again, I shall update the progress on this web site in the next couple of weeks.
RECIPE - OIL PIGMENTS
- Note that the 3 basic oil to use are linseed, walnut and poppy seed oil.
Linseed
Most commonly used, fastest drying, but yellows more, the cold pressed variety maybe better, also if leave in the sun it can bleach out the yellowness more.
Walnut
popular with the 16th C Italian painters, dries slower, the supermarket variety is not right, needs to purified.
Poppy
This is Rembrandt 's favourite for grinding white as it is the least yellow oil, dries the slowest and the thinnest.
- Note thick oil makes thinner paint, thin oil makes the paint more buttery and less runny
- All pigments dry at different rates, lead based ones dry quickest, blues too. Also advantageous to use poppy for mixing these colours as it is the least yellow and won't turn blue into green, white into yellow etc
- Note titanium white and zinc white best with walnut oil
- All earth, black and synthetic colours are ok with linseeed as they don't get affected much by the yellow
- Note pigments all need different amount of oil, so add a bit at the time, grind a small amount ( walnut size) well and it should be shiny and not dull when using the palette knife to gather on the grinding surface. The texture should feel buttery.
Lead white will be runny with small amount of oil, raw sienna needs lots of oil.
- Less oil = less gloss
- Spread the pigment thinly and grind the paint really fine so all will mix well, better to over grind than under grind to mix the pigment and oil well to retain shine.
- If store with Aluminium foil and let out the air the oil paint should keep for several weeks, tube ones tend to have less oil.
RECIPE - EGG TEMPERA ON CANVAS
Notes to come!
OTHER TIPS
-Turpentine - if brush on paper and it doesn't yellow too much then it is good quality